Showing posts with label blog. Show all posts

Wednesday, November 20, 2013

Wednesday Chore List

Tip of the Day: Use your Fabulously Clever made Dry Erase or Chalkboard picture frame in the kitchen to keep track of what you need and where you buy it along with any stops for bank, bills or whatnots. On Weds, you can make a quick travel map/schedule of where you need to go. I always suggest going to the furthest place first, and working your way towards your home.


Follow us on Facebook: https://www.facebook.com/pages/Fabulously-Clever/317923044966148
or Join our Group and post your Fabulously Clever stuff!!  https://www.facebook.com/groups/394125210634279/


Dry Erase Message Center

Here is a quick picture of my Picture Frame Dry Erase Board that I keep in the kitchen. I write down whatever item I am out of or running low on and the store I purchase it from. I compile my list on Tuesday night and head out on Wednesday to shop. Also, works great for leaving messages/reminders to family members!


To make your own board you will need the following supplies:

1 Picture Frame.  I used a 11x 13.
Burlap, Fabric, or Scrapbook Paper to fit inside the picture frame cut to size of your frame
Embellishments for your frame.  I used silverware I found at a thrift store.  You could use just about anything or go minimalist and leave your frame plain.
Glue if you are attaching embellishments.  I used E600 glue to hold down my heavier silverware.
Tape or regular glue to tack down your background.
Dry Erase Markers

This project only took a matter of minutes to make!
I applied my silverware using a smoosh of E600 glue at each end of the flatware piece.  For the fork and spoon, apply glue at the underside of the fork tong and base of the spoon. Basically, the area that would lie flat if placed on a table.
While my silverware dried, I pulled out the backing of the picture frame and cut my burlap to size.  Tacked it down with a little double sided sticky tape, and slid it back into the frame.  

All done! Don't you feel highly accomplished and super crafty now??  I know I was beaming from ear to ear when this was done.  Felt like I finished the Mona Lisa.  Okay, who am I kidding?  I'm crafty....not an artist!!

Crafty Tip:  Buy a bunch of 4 x 6 frames from the thrift store or the dollar store.  Use light colored holiday scrapbook paper to fit frame backing.  Write the name of each dish, cheese, wine, whatnot and place near each item on your holiday buffet or table!!

Don't forget to follow us on Facebook at Fabulously Clever!!  

PIN ME....PIN ME!!

Sunday, October 6, 2013

Dollar Store Craft Ideas

It is one of my favorite times of the year.....HALLOWEEN!!  When I was younger, my sister and I used to spend every Halloween decorating macabrely and devising our next wild costume.  Now that I am older I still enjoy decorating.  Just in a more toned down fashion.

Have you heard of the Dollar Store Craft Challenge?  O-M-GEEE  IT IS SO MUCH FUN!!  I went a little crazy and did multiple crafts.  I could not help myself.  Sometimes you can find the most amazing things at the Dollar Tree!!  Okay...moving on.  So, I started with a couple storage jars, candle sticks.  Broke out the E600 glue and made apothecary jars with chalkboard paint  labels.  I went with a basic ivory so I could change out the decor from holiday to holiday. Quickly added some scrapbooking Halloween labels and a couple cute little spiders.  Finished up with little electric tape to make the stitches. Voila!

Next up......the adorable little pumpkins!! Grabbed a few of these cuties from Dollar Tree.  They do have a hideous seam around the middle of the pumpkins, so I had to devise a way to hide that mess!  Quickly covered them with a paint of black latex paint.  When it dried I was disappointed that I did not notice I used the matte finish paint.  DRATS!  Found a bottle of black glitter paint and went over with a quick sloppy coating.  Once dried I applied some adorable googgly eyes to one pumpkin and some glittery spiderwebs with spiders on the two others.

Lastly, the large pumpkin.  Yes...YES...I know, that did not come from the Dollar Tree.  I did find the grosgrain black ribbon there.  Wrapped the pumpkin with a bow.  Added some scrapbook trim to make the pumpkin pop.

There you have it.  An adorable Halloween spread that your children would love for less than a Venti Frapaccino from Starbucks!!!

Hope this inspires you to head to your local Dollar Tree and take on the Craft Challenge.  BTW...I would love to see what you made.  Feel free to post it to my Facebook Page:  Fabulously Clever.  https://www.facebook.com/pages/Fabulously-Clever/317923044966148?hc_location=timeline


Wednesday, January 23, 2013

Over the Religion of Dieting ~ OMG~ BabyCakes Donut Recipe!!

BTW~~~ I Am Sooooo Over the Religion of Dieting


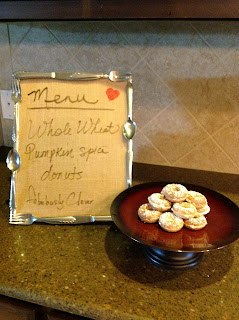
Whole Wheat Pumpkin Spice Donuts
Makes 12 donuts

Prepare the Donut Maker with non-stick spray, and heat the Donut Maker according to the instructions.
...

Put in mixing bowl and combine:
1/2 cup whole wheat flour
1/4 cup sugar
2 Teaspoons baking powder
1/4 Teaspoon salt
1 tablespoon pumpkin pie spice
Add and blend just until the ingredients are mixed well and dough is creamy:

1/4 cup half and half
1 large egg
1 Teaspoon vanilla extract
2 Tablespoons butter
2 Tablespoons of canned pumping (optional)

Immediately scoop the batter into each of the molds. Close the lid and bake for 3 to 5 minutes. Remove from the Donut Maker and rest on a wire rack. Top with icing, confectioner’s sugar or cinnamon sugar.

Tip: It is suggested you should put the mixture in a piping bag & pipe into the molds, this prevents crispy edges which I happen to Like!


Buy this Plate, Menu or other Items I have for sale by clicking on the photo or by visiting
http://www.ebay.com/fabulouslycleverbydawn

Visit, browse, window shop
Network and show us what you are up to!